Top Ad 728x90

Saturday, April 12, 2025

Parmesan Crusted Chicken with Creamy Garlic Sauce

by


 Parmesan Crusted Chicken with Creamy Garlic Sauce


Crispy, golden chicken meets rich, velvety garlic sauce in this simple yet elegant dinner recipe. It’s perfect for weeknights when you want something comforting without the fuss, yet impressive enough for guests. Serve it with roasted veggies, mashed potatoes, or fluffy rice for a complete meal.


---


Ingredients


For the Parmesan Crusted Chicken:


2 boneless, skinless chicken breasts


1/2 cup all-purpose flour


1/4 cup grated Parmesan cheese


1 teaspoon garlic powder


1/2 teaspoon onion powder


1/4 teaspoon salt


1/8 teaspoon black pepper


For the Creamy Garlic Sauce:


1/2 cup (1 stick) unsalted butter


1/4 cup heavy cream


2 cloves garlic, minced


1/4 teaspoon salt


1/8 teaspoon black pepper


---


Instructions


1. Preheat and Prepare


Preheat your oven to 400°F (200°C). Line a baking sheet with parchment paper for easy cleanup and even cooking.


2. Coat the Chicken


In a shallow dish, mix together:


Flour


Parmesan cheese


Garlic powder


Onion powder


Salt and pepper


Pat chicken breasts dry, then press each piece into the mixture, coating all sides well.


3. Bake to Perfection


Place the coated chicken on your prepared baking sheet.

Bake for 15–20 minutes, or until the internal temperature reaches 165°F (74°C) and the crust is lightly golden.


4. Make the Creamy Garlic Sauce


In a small saucepan over medium heat:


Melt the butter.


Stir in the heavy cream and minced garlic.


Add salt and pepper.

Simmer gently, whisking frequently, until the sauce becomes smooth and slightly thickened — about 4–5 minutes.


5. Plate and Serve


Arrange your baked chicken on plates and drizzle generously with the warm garlic cream sauce. Garnish with a bit of fresh parsley or extra Parmesan if desired.


---


Pro Tips & Variations


Cutlets cook faster: Slice thicker chicken breasts in half horizontally for even cooking.


Make it extra crispy: Add 1–2 tablespoons of panko breadcrumbs to the coating mix.


Boost flavor: Squeeze a little lemon juice over the chicken before serving for a fresh pop.


Pairings: Serve with garlic mashed potatoes, steamed green beans, or a simple Caesar salad.


---


Why You’ll Love This Recipe


It’s crispy, creamy, and incredibly satisfying — and it all comes together in under 30 

minutes. This is the kind of dish that makes you look like a kitchen rock star without breaking a sweat.

Mexican Chicken Pinwheels

by


 Mexican Chicken Pinwheels: The Perfect Party Appetizer Bursting with Flavor


If you're looking for a quick, crowd-pleasing appetizer that’s both delicious and easy to make, look no further than Mexican Chicken Pinwheels. These bite-sized roll-ups are loaded with creamy, savory, and sweet notes that come together in a flavor-packed swirl. Whether you’re hosting a game day party, planning a potluck, or just need a tasty snack, these pinwheels will disappear in minutes. Best of all? They’re make-ahead friendly and require zero cooking once the chicken is prepped.


---


Why You'll Love These Mexican Chicken Pinwheels


Easy to prepare with minimal ingredients


Sweet, salty, and savory flavors in every bite


Perfect for parties, lunchboxes, or snacks


Customizable and allergy-friendly with simple swaps


---


Ingredients (Yields ~36 Pinwheels)


2 boneless, skinless chicken breasts (cooked and finely shredded)


The heart of the recipe—shredded chicken provides lean protein and a meaty texture that binds beautifully with the creamy mix.


¾ cup mayonnaise


Acts as the rich, creamy base that holds the filling together and enhances the overall mouthfeel. Choose a high-quality mayo for the best flavor.


2 green onions, thinly sliced


Adds a mild onion flavor with a fresh crunch that brightens up each bite.


2 tablespoons dried minced onion


Gives the filling an extra punch of umami and depth that’s more concentrated than fresh onion.


1 teaspoon garlic salt


Delivers a subtle garlicky seasoning and balances the creamy and sweet elements.


3 tablespoons light brown sugar (packed)


Adds a touch of sweetness that contrasts beautifully with the savory chicken and salty mayo, creating that addictive balance of flavors.


½ cup red seedless grapes, thinly sliced


These juicy grapes provide bursts of sweetness and a refreshing bite—unexpected, but so good.


⅓ cup sliced almonds (optional)


Brings a nutty crunch to the mix. Can be omitted if you're allergic or want a smoother texture.


Salt and pepper, to taste


Season to your personal preference—don’t skip this step; it fine-tunes the flavor.


4 burrito-sized flour tortillas


The perfect wrap to hold everything together. Soft, pliable, and neutral enough to let the filling shine.


---


Step-by-Step Instructions


Step 1: Mix the Filling


In a large bowl, combine the shredded chicken, mayonnaise, green onions, dried onion, garlic salt, and brown sugar. Stir until the mixture is smooth and cohesive.


Gently fold in the sliced grapes and sliced almonds. Taste and add salt and pepper as needed.


Step 2: Assemble the Rolls


Lay a tortilla flat on a clean surface. Spread about ¼ of the chicken mixture evenly over the tortilla, making sure to go all the way to the edges.


Starting from one side, roll the tortilla up tightly but gently to avoid squeezing the filling out.


Repeat with the remaining tortillas and filling.


Step 3: Chill for Clean Slicing


Wrap each rolled tortilla in plastic wrap. Refrigerate for at least 1 hour—this firms them up and makes slicing a breeze.


Step 4: Slice and Serve


Unwrap each roll and place it seam side down. Using a sharp serrated knife, slice into ¾ to 1-inch thick pinwheels.


Arrange on a serving tray and watch them vanish!


---


Why This Recipe Is Loved


These Mexican Chicken Pinwheels are adored for their balance of textures and flavors—creamy, crunchy, savory, and sweet. They’re portable, pretty, and endlessly snackable, making them a go-to for entertainers and home cooks alike.


---


Pro Tips for Perfect Pinwheels


Cook chicken ahead (boiled, roasted, or rotisserie works great).


Chill before slicing to get clean, neat rounds.


Use a sharp serrated knife to avoid flattening or tearing the pinwheels.


Want a flavor twist? Add shredded pepper jack or a dash of lime juice.


No almonds? Sunflower seeds or crushed tortilla chips work for added crunch.


---


Serving Suggestions


Serve these pinwheels with:


A side of salsa or guacamole


Fresh vegetable sticks or a crisp side salad


Tortilla chips and a cold drink for a festive party spread


They’re perfect on a holiday platter, at a bridal shower, or even as a light lunch with fruit on the side.


---


Conclusion: A Simple Recipe That Steals the Show


With their irresistible flavor, make-ahead ease, and gorgeous presentation, Mexican Chicken Pinwheels are the kind of dish that becomes a signature recipe. You’ll love how quickly they come together and how fast they vanish from the platter. Sweet grapes, savory chicken, creamy mayo, and a touch of crunch create a balance that keeps people coming back for more.


Try them once, and these easy chicken pinwheel wraps will become your go-to for every gathering.


Bookmark this recipe and share it—beca

use everyone deserves a bite of this perfection.


Friday, April 11, 2025

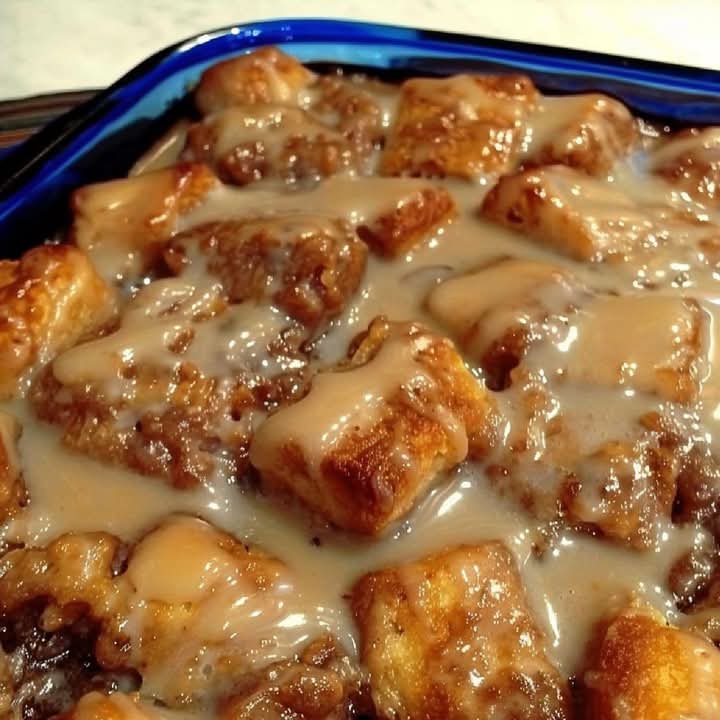
Cinna-bun Cake In The Oven

by


 Cinna-bun Cake In The Oven Recipe

Ingredients

For the cake:

3 C. All-purpose flour

1 C. Granulated sugar

1 Tbsp. Baking powder

1 ½ C. Milk

2 large eggs

8 Tbsp. Butter unsalted and melted

1 tsp. Vanilla extract

For the topping:

1 C. Butter softened

1 C. Brown sugar packed

3 Tbsp. All-purpose flour

3 tsp. Cinnamon

For the glaze:

2 C. Powdered sugar

⅓ C. Milk

1 tsp. Vanilla extract

How To Make Cinna-bun Cake In The Oven Recipe

Preheat the oven to 350 degrees.

In a mixing bowl, combine all of the ingredients for the cake and blend until smooth. Spread the cake mix into the bottom of a well-greased 9×13 baking dish.

Add the ingredients for the topping into a mixing bowl until smooth and creamy. Drop the topping mixture by the spoonful on top of the cake mixture in the baking dish. Use a butter knife to swirl the topping through the top layer of the cake mixture.

Bake the cake for 40-45 minutes until a knife comes out clean when inserted into the center.

Mix the ingredients for the glaze together until smooth and pour over the warm cake.

Allow the glaze to set before serving.

Roasted Brussels Sprouts

by


Crispy Roasted Brussels Sprouts Recipe: A Simple Side Dish That Steals the Show

If you've ever thought Brussels sprouts weren't your thing, think again. This Roasted Brussels Sprouts recipe transforms the humble sprout into a golden, crispy, flavor-packed superstar. Roasted until beautifully caramelized with tender centers and irresistibly crisp edges, these sprouts are a total game-changer for weeknight dinners, holiday feasts, or anytime you need a simple but standout side dish. Packed with nutrients, loaded with savory flavor, and finished with a pop of brightness, this is the kind of recipe that makes people say, “I never knew Brussels sprouts could taste this good!”

Whether you're serving them alongside roast chicken, steak, or a vegetarian grain bowl, this dish adds bold texture and flavor that complements just about everything. Let’s break it down.


---

Ingredients & Their Purpose

Each ingredient plays a key role in creating the perfect roasted Brussels sprouts. Don’t skimp—quality and balance matter here!

1½ pounds Brussels sprouts – The star of the show. Look for firm, bright green sprouts. Halving them allows for even roasting and maximum surface caramelization.

3 tablespoons olive oil – Coats the sprouts for even roasting, helping them crisp up while enhancing flavor.

½ teaspoon salt – Enhances natural flavors and draws out moisture for better roasting.

¼ teaspoon black pepper – Adds subtle heat and earthy depth.

2 cloves garlic, minced (optional) – Brings in an aromatic, savory punch. Add it near the end of roasting to prevent burning.

1 tablespoon balsamic vinegar or lemon juice (optional) – Adds a tangy, bright finish that cuts through the richness and highlights the caramelized edges.


---

Step-by-Step Instructions

Follow these easy steps for perfect, crispy roasted Brussels sprouts every time:

1. Preheat the Oven

Set your oven to 425°F (220°C). A hot oven is essential for creating that crave-worthy crispy exterior.

2. Prepare the Sprouts

Trim the tough stem ends from each Brussels sprout and remove any yellowed or damaged outer leaves. Then, cut each sprout in half lengthwise to expose the flat side that will caramelize against the hot baking sheet.

3. Season Thoroughly

In a large mixing bowl, toss the halved sprouts with olive oil, salt, and pepper. If using garlic, wait to add it until the last 10 minutes of roasting to avoid bitterness.

4. Arrange on a Baking Sheet

Spread the sprouts out cut-side down in a single layer on a parchment-lined or foil-lined baking sheet. This positioning helps them brown deeply and evenly.

5. Roast to Perfection

Place in the oven and roast for 25 to 30 minutes, flipping the sprouts after about 15 minutes. You're looking for deeply golden edges and tender centers.

6. Finish with a Bright Kick (Optional)

Once out of the oven, drizzle with balsamic vinegar or lemon juice while still hot. This final step enhances flavor and balances the richness of the roasted vegetables.


---

Why Everyone Loves This Recipe

Incredible Texture – Crispy outside, soft inside—roasting creates the perfect contrast.

Bold Flavor – The natural sweetness of Brussels sprouts shines when roasted, especially with a savory-salty seasoning.

Super Simple – Just a handful of ingredients and under 10 minutes of prep.

Versatile – Great on its own, or enhanced with add-ons like Parmesan, bacon, or a honey glaze.


---

Pro Tips for the Best Roasted Brussels Sprouts

Don’t overcrowd the pan. This is the #1 rule. Give your sprouts room to breathe or they’ll steam, not roast.

Use a hot pan. Preheating your baking sheet in the oven for 5 minutes before adding the sprouts can lead to even crispier bottoms.

Finish smart. Acid like balsamic or lemon lifts the dish. A touch of honey adds a sweet-savory contrast. A sprinkle of Parmesan gives it a cheesy edge.

Batch size matters. If you're doubling the recipe, use two pans. Crowding = soggy sprouts.


---

Serving Suggestions

These roasted Brussels sprouts pair beautifully with:

Roast chicken or beef tenderloin

Grain bowls with quinoa, farro, or couscous

Holiday meals with turkey, stuffing, and mashed potatoes

Creamy polenta or buttery mashed cauliflower for a comforting vegetarian pairing


They’re also amazing cold the next day tossed into a salad or added to scrambled eggs.


---

Final Thoughts: Simple, Elegant, and Unforgettably Delicious

This crispy roasted Brussels sprouts recipe is proof that the simplest ingredients, treated right, can create something unforgettable. It's the kind of dish that turns skeptics into superfans with just one bite. Whether you're cooking for a crowd or just for yourself, these sprouts deliver maximum flavor with minimal effort.

Ready to impress? Bookmark this recipe—because once you try it, you'll be coming back again and again. For a side dish that’s healthy, craveable, and weeknight-friendly, these roasted Brussels sprouts are the ultimate kitchen win.


White Chicken Enchiladas

by


White Chicken Enchiladas


Ingredients:


8 to 10 flour tortillas (soft taco size)


2 cups cooked, shredded chicken


2 cups shredded Monterey Jack cheese (divided)


3 tablespoons butter


3 tablespoons all-purpose flour


2 cups chicken broth


1 cup sour cream


1 (4 oz) can diced green chilies


---


Instructions:


1. Preheat oven to 350°F (175°C). Lightly grease a 9x13 baking dish.


2. Assemble the enchiladas:


Mix the shredded chicken with 1 cup of the cheese.


Spoon some of the mixture into each tortilla, roll them up, and place them seam-side down in the baking dish.


3. Make the white sauce:


In a medium saucepan, melt butter over medium heat.


Whisk in the flour and cook for about 1 minute to form a roux.


Slowly whisk in the chicken broth, and cook until it thickens (about 3–5 minutes).


Remove from heat and stir in the sour cream and green chilies. Don’t let it boil, or the sour cream may curdle.


4. Assemble and bake:


Pour the sauce evenly over the enchiladas.


Sprinkle the remaining 1 cup of cheese on top.


Bake uncovered for 20–25 minutes, then broil for 2–3 minutes if you want a golden top.


---


Tips:


Rotisserie chicken works great for this recipe.


Add a little ch

opped cilantro or green onion on top after baking for extra flavor.


Thursday, April 10, 2025

Garlic Butter Steak, Shrimp & Crispy Potatoes

by


Garlic Butter Steak, Shrimp & Crispy Potatoes


Looking for the ultimate surf-and-turf dinner that feels gourmet but comes together easily? This Garlic Butter Steak, Shrimp & Crispy Potatoes is a show-stopping dish packed with bold flavor, juicy textures, and a golden, buttery finish. Perfect for weeknight indulgence or impressing guests on the weekend.


---


Why You'll Love This Recipe


One skillet, big flavor – Minimal cleanup, maximum deliciousness.


Rich & savory – Garlic butter adds a decadent depth to every bite.


Versatile & quick – Customize the steak cut, shrimp size, and even swap in sweet potatoes if desired.


---


Ingredients


For the potatoes:


1 ½ lbs baby Yukon gold potatoes, halved


2 tbsp olive oil


1 tsp garlic powder


Salt and freshly ground black pepper, to taste


For the steak & shrimp:


1 lb ribeye or sirloin steak, cut into bite-sized cubes


¾ lb large shrimp, peeled and deveined (tails on or off)


Salt and pepper, to taste


2 tbsp olive oil, divided


4 tbsp unsalted butter


5 cloves garlic, minced


1 tsp smoked paprika (optional for color)


1 tbsp fresh chopped parsley (for garnish)


Lemon wedges, for serving


---


Instructions


Step 1: Crisp the Potatoes


1. Boil halved potatoes in salted water for about 10 minutes, until just fork-tender. Drain well.


2. Heat 2 tbsp olive oil in a large cast iron skillet over medium-high heat.


3. Add the potatoes cut-side down and cook undisturbed for 5–7 minutes, until golden and crispy.


4. Sprinkle with garlic powder, salt, and pepper. Toss and crisp another 2 minutes. Transfer to a plate and keep warm.


Step 2: Sear the Steak


1. Pat steak cubes dry with paper towels. Season generously with salt and pepper.


2. In the same skillet, add 1 tbsp olive oil. Add steak in a single layer (don’t overcrowd).


3. Sear for 2–3 minutes per side until a crust forms and internal temp hits desired doneness (125°F for medium-rare).


4. Transfer steak to the same plate as the potatoes.


Step 3: Sauté the Shrimp


1. Add 1 tbsp olive oil to the skillet if needed.


2. Add shrimp in a single layer, season with salt, pepper, and paprika.


3. Cook for 1–2 minutes per side until pink and opaque. Remove and set aside.


Step 4: Make Garlic Butter Sauce


1. Lower heat to medium. Add butter and garlic to the skillet.


2. Sauté for 1 minute, just until garlic is fragrant and golden (not browned).


3. Return the steak, shrimp, and potatoes to the skillet. Toss gently to coat everything in the garlic butter.


---


Pro Tips


Dry = crispy: Patting steak and shrimp dry ensures a golden sear.


Cast iron is king: It holds heat evenly and helps develop that rich crust.


Customize it: Add chopped asparagus, zucchini, or a pinch of chili flakes if you want a little heat (optional).


---


Serving Suggestions


Serve straight from the skillet with a sprinkle of fresh parsley and a few lemon wedges on the side. Pair with a crisp green salad, garlic bread, or a chilled glass of white wine or light red.


---


Conclusion


This Garlic Butter Steak, Shrimp & Crispy Potatoes recipe is the kind of meal that makes you feel like a rockstar in the kitchen—simple, satisfying, and seriously delicious. Whether it’s a weeknight dinner or a special treat

, it’s a recipe you’ll come back to again and again.


Garlic Bread Pizza

by


 Garlic Bread Pizza: The Ultimate Cheesy, Garlicky Delight


If you love garlic bread and pizza, why choose between them? This Garlic Bread Pizza combines the best of both worlds—crispy, buttery garlic bread topped with gooey melted cheese, rich tomato sauce, and your favorite toppings. It’s the perfect weeknight dinner, game-day snack, or quick comfort food that delivers big flavors with minimal effort.


Why You’ll Love This Recipe


Quick & Easy – Ready in under 20 minutes with just a few ingredients.


Irresistibly Garlicky – Every bite is packed with buttery garlic flavor.


Crispy & Cheesy – A crunchy base topped with melty mozzarella and your favorite toppings.


Customizable – Make it classic with pepperoni or go gourmet with fresh basil, ricotta, or veggies.


---


Ingredients & Their Roles


For the Garlic Bread Base:


1 loaf of French bread (or Italian bread) – Provides the perfect crispy yet chewy foundation.


4 tbsp unsalted butter, softened – Creates a rich, buttery base and helps the garlic flavor soak in.


3 cloves garlic, minced – The heart of the recipe, infusing every bite with robust garlic flavor.


1 tbsp fresh parsley, chopped – Adds freshness and a pop of color.


¼ tsp salt – Enhances the flavors and balances the garlic and butter.


For the Pizza Topping:


½ cup pizza sauce – Brings in a tangy, tomato-rich flavor base.


1 ½ cups shredded mozzarella cheese – Creates that signature melty, stretchy texture.


¼ cup Parmesan cheese, grated – Adds a salty, nutty bite.


Toppings of choice – Pepperoni, mushrooms, bell peppers, olives, sausage, or anything you love!


---


Step-by-Step Instructions


1. Prep the Oven & Bread


Preheat your oven to 400°F (200°C). Line a baking sheet with foil or parchment paper for easy cleanup.


Cut the French bread in half lengthwise. Place the halves cut-side up on the baking sheet.


2. Make the Garlic Butter


In a small bowl, mix butter, minced garlic, parsley, and salt. Spread this mixture evenly over the cut sides of the bread. Toast in the oven for 5-7 minutes until lightly golden and crisp.


3. Add Sauce & Cheese


Remove the toasted garlic bread from the oven. Spread pizza sauce over each piece, leaving a slight border. Sprinkle generously with mozzarella and Parmesan cheese.


4. Add Toppings & Bake


Layer on your favorite pizza toppings. Return the bread to the oven and bake for 8-10 minutes, or until the cheese is melted and bubbly.


5. Slice & Serve


Let it cool slightly, then slice into portions and enjoy!


---


Pro Tips for the Best Garlic Bread Pizza


Pre-toast the bread – This prevents it from getting soggy when you add the sauce.


Use fresh garlic – Freshly minced garlic offers the best punch of flavor.


Go heavy on cheese – A mix of mozzarella, Parmesan, and even provolone takes the texture up a notch.


Broil for extra crispiness – Want an even crispier finish? Broil for the last 1-2 minutes.


---


Serving Suggestions


Pair this Garlic Bread Pizza with:


A fresh side salad – A crisp Caesar or garden salad balances the richness.


Dipping sauces – Marinara, ranch, or garlic butter for an extra indulgent touch.


Soup pairing – A warm bowl of tomato basil soup makes it a comforting meal.


---


Why This Recipe Stands Out


This Garlic Bread Pizza is the ultimate quick-fix meal that doesn’t compromise on flavor. With buttery, garlicky goodness, a crispy base, and gooey melted cheese, it’s an instant crowd-pleaser. Whether you’re looking for a fast weeknight dinner, a snack for movie night, or an easy party appetizer, this recipe delivers every time. Try it once, and it will become a go-to favorite in your kitchen!


Craving homemade pizza but short on time? This Garlic Bread Pizza is your perfect solution. Make it today and experience the ultimate cheesy, garlicky perfection!

Top Ad 728x90